Showing posts with label embroidery. Show all posts

Sunday, January 22, 2012

Happy New Year...Only A Few Weeks Late!

Happy 2012! No good excuses for not blogging, especially since we just had nearly a week off because of snow. Usually I would quickly become stir crazy and ready to leave the house, but this break was welcomed. It was so cozy and happy-- the kids and I snuggled and watched movies and sewed! Harper and I made pajamas for her American Girl, Rebecca-- I did it without a pattern, though-- just cut and sewed. So they are far from perfect! Harper doesn't seem to notice, though. :)


A few weeks back, I embroidered this for the girls' room...

 I love little, simple embroidery patterns that I can leave in the hoop to hang and display. This is now hanging above the light switch in their room.

I wanted to make something for Mason, too, but its hard to find patterns that aren't "girly." So I decided to stitch one of our favorite sayings for him... everytime I tell him that I love him, he says that he loves me more. Then I say that it's not possible, and he says he's the first kid ever who has loved his mom more than she loves her child. He's so sweet. When I stitched this for him, I told him that since it's forever embroidered, it's final-- I really do love him more. :) Now this will go in his room above his light switch.


Wednesday, August 10, 2011

Fun Weekend Projects

This weekend was a busy one, but I had time to squeeze in a few fun projects. A relative shared the first idea with me... cutting open glow sticks and splattering them into glass vases to make a fun patio table light.

The kids thought it was super cool. May have overdone the amount of glowstick goo a bit, but oh well!

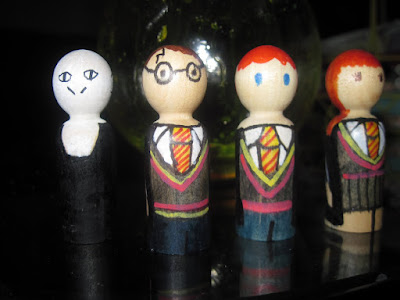
I wanted to complete a little project for Mason as he seems to frequently get the short end of the stick project-wise. He loves Harry Potter, and I have seen several artists on Etsy and other places making these little wooden peg dolls. Of course, I would never sell mine since I borrowed the idea (that's the reason I like to tell myself, never mind the squiggly lines and such!)


The creepy looking one is Voldemort, if you can't tell. :) They may not be perfect, but Mason loves them!

I finally finished up a project for me that I've been working on for a while. I found this retro Levi's fabric purse/hobo bag at the Goodwill outlet. I thought it would be perfect to do a bit of embroidery on. The book I used for the patterns is "Embroidery for Little Miss Crafty" by Helen Dardik.


Now, its time for my favorite part of completing weekend projects.... deciding which projects to work on next weekend! :)

Friday, August 5, 2011

For the Birds

I love birds. I envy their ability to fly away upon a whim. I love how fluffy they look and how fragile they are. I love waking up to their songs in the morning.

I love birds so much that last week I got bird tattoos on my wrists to symbolize my happy little family. <3


Last Friday-- a cheerful, sunny Friday--I happened upon a "vintage linen" sale at an old house here in West Seattle. 4 older ladies gathered their things together to sell, and while eager scavengers scoured their goods, they sat on the covered porch of the home and drank raspberry lemonade. I found little bird trinkets that I made into jewelry.


To top off my bird week, I spotted a bird embroidery project in Jenny Hart's AWESOME book, "Embroidered Effects." I had the perfect jeans for this project-- old, soft, and faded. It was fun to stitch them and it is fun to wear them.


Tuesday, August 2, 2011

A Georgia Shirt for My Georgia Girl

As you may know, I'm totally obsessed with Pinterest, a website where people "pin" their favorite things.... quotes, outfits, projects, recipes.... on to their own personal "bulletin boards." It's very addicting and very interesting to look at. Anyway, I've noticed lots of map projects like framed maps of where people met and fell in love and map puzzles and placemats. That gave me the idea, since my youngest daughter is named after a state, to make her a state of Georgia shirt. How cute for her to have a shirt displaying where her family is from as well as her name!  I just printed out a Georgia state map from Google images and traced it on to a piece of white felt. After cutting out the outline of the state, I embroidered "Georgia" onto the felt followed by a cut out heart. Then, for the last step, I hand sewed the state to a black t-shirt. Georgia is so proud of her new name/state shirt!


Friday, May 27, 2011

Happy Bursts of Color

Isn't it fun when kids bring artwork home from school? Suddenly an empty space on the wall or refrigerator has a happy burst of color on it.

I've decided to revert back to my childhood and post my own "artwork" around the house. It makes me happy to see my embroidery fill an awkward hole between photographs...

Or liven up my little kitchen!
Both projects were done on premade canvas frames found in the dollar section at Michaels. I just stitched my design right on to them, and then I had my very own happy bursts of color around my house.


Tuesday, May 10, 2011

Potholder Project

I love my sunglasses.

They are very cute Betsy Johnson cat-eye sunglasses that I bought on clearance from Marshalls. The problem is, because they were from Marshalls, they did not come with a case. And as my fellow Seattleites know, sunglasses are especially hard to keep track of since we go, like, 8 months without needing them. But when we do need them, boy do we ever!

Typically, my sunglasses are loose in my purse, which is really bad for my sunglasses. They always end up with lip gloss, pen marks, or animal cracker crumbs on them.

Other times, I hunt and hunt through my purse for my sunglasses, and they are nowhere to be found. :)

So I came up with a fun solution for where to store my sunglasses! They will still be in my purse (hopefully), but at least now they will be in a cute, vintage-looking case. A case made from a potholder!
I found this bright striped potholder at Target for $1.99. I cut off the little loop and embroidered it with cute looking styles of glasses that I found on the internet.


After I was done with the embroidery, I simply folded the potholder in half and stitched it around 2 sides using my denim needle on my machine.  Voila! A cute sunglasses case that will hopefully keep my lovely glasses safe for a long time to come.


Tuesday, April 19, 2011

Redwork Revival

Some nights I am torn: my mind and my hands want to create something, but my body is just too tired to cut fabric and sit hunched over my sewing machine.  Some nights I just want to hang out on the couch with my husband and watch our favorite tv shows... but make something at the same time!  The perfect solution to my quandary came as I was wandering around Stitches, a little fabric shop in Capitol Hill. I saw the cutest, most retro, most kitschy-fabulous embroidery patterns ever by a company called Sublime Stitching. As their website says, "this ain't your grandma's embroidery!" (Not that a grandma's embroidery would be a bad thing, in my opinion.) I bought a pattern to embroider on a kitchen towel, but before I delved into different colored floss and intricate patterns, I thought I would try something more simple first. Hence this pattern, found at the Pacific Fabric Outlet Store just over the bridge:

For one thing, I totally agree with the statement. :)  And for another, I was curious about what "redwork" was. I found this explantion on the website redwork.info:

"Redwork became popular in the late 1800's because of a colorfast thread made in Turkey, from a secret recipe. Up until then, colored threads did not hold their color in the wash and therefore, could not be used successfully to adorn everyday items like bedspreads or dish towels. The simplicity of redwork designs, and the fact that they were embroidered with very simple stitches on inexpensive muslins, meant that nearly everyone could have decorated linens. Children often learned how to embroider on 'Penny Squares', little designs printed on muslin and sold at the general stores for a penny. Redwork quilts were mostly 'summer weight' linens, meaning they had no batting. The Redwork squares were usually stitched together without sashing, and either quilted to a backing with a feather stitch or simply tied with string or yarn."

Very cool! Plus, I love how the whole pattern is supposed to be done in red floss. No switching out colors or deciding what color would look best where. I could handle this! I gathered my supplies... an embroidery hoop to hold the fabric taut; a needle with an eye that was big enough to easily thread the floss so I wouldn't get totally frustrated; a pair of little scissors for trimming loose ends, and that was it! It came with all the floss I needed. And it only took me a weekend to complete it--it's nice to work on an "instant satisfaction" piece once in a while!


The pattern was stamped on the fabric in a blue ink that was to be stitched over, and it completely came out when I was done by soaking the fabric in cold water for about 5 minutes.  Next step: hand sew the completed project onto a throw pillow that will sit on my lovely leopard-print couch!